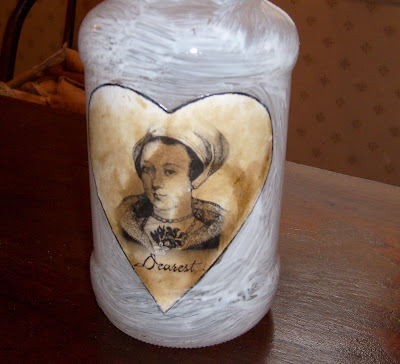
Hope you all are having a wonderful Friday night. Here is a sneak peek at what I will be offering on Ranting Raven. My dad may this wonderful early sconce. He made one for me and one to sell. I added the beeswax dipped votive.
Friday, February 29, 2008
Wednesday, February 27, 2008
Cold Wintry Day
We got hit last night with some more snow! We got about 2 inches and are expecting a little more today. I know everyone is sick to death of snow but I still think it's beautiful! Speckles and Odee were having a blast in it while their grumpy big sister was taking it easy inside where it is nice and toasty. We had a little scare though as our electric went off for a few min. And I was like oh no! Bad day for this to happen. Since we heat with an electric furnace we keep a kerosene heater for emergency use; but it was empty! Any way thank heavens the electric stayed on!
I made one last snowman for the season; his name is Flake and he was made using a Venna's Mercantile pattern. I loved the way he turned out and he was so easy! I will be listing him on the website tonight along with a vintage baby dress.
Hope you are all warm and toasty!
Tuesday, February 26, 2008
HomeMade Sausage
It's a cold windy wintry day here in eastern KY. What a perfect day for homemade sausage! After I saw this post http://homesicktexan.blogspot.com/2008/02/breakfast-sausage-to-begin-day.html I knew I had to have me some homemade sausage! Here is her original recipe and noted are the changes I made.
Breakfast sausage
Ingredients:
2 lbs of ground pork (our market didn't have ground pork so I bought pork rump roast and ground it in my kitchen aid grinder attachment)
1 tablespoon of sage
2 teaspoons of marjoram ( I used 1 t.)
2 teaspoons of thyme (I used 1 t.)
2 teaspoons of red pepper flakes (I used 1 t.)
1/2 teaspoon of cayenne pepper (omitted)
1 teaspoon of brown sugar
1/2 teaspoon of salt
1/2 teaspoon of black pepper
Method:1. Mix all ingredients together.2. Form into patties and fry six minutes on each side.Keeps in the refrigerator for a week.Note: The spice measurements are not an exact science, and what I tend to do while mixing is pinch off a little bit and fry it up to see if I like the flavor. This is what I start with, but feel free to experiment.
I also added the spices prior to grinding the meat (per my daddy's suggestion) It incorporates the spices better throughout the meat. Also after I got the sausage ground and the seasoning right. I made patties and froze them on a cookie sheet. I added freezer paper between the patties and placed them in a freezer bag. I thought the sausage was pretty yummy; next time I will use a little less sage. It would be yummy on pizza!
Monday, February 25, 2008
First Sign of Spring
I was so pleased today when I strolled around the yard to see my Tansy coming up. Tansy is the first thing in my garden to stretch it's legs every spring. It amazes me every year to see these bright green healthy plants emerge from a hard cold ground. Spring is for me a very uplifting time of year. It represents hope and new beginnings as well as rebirth.
Ecc 3:1To every [thing there is] a season, and a time to every purpose under the heaven:
I wanted to share this roll recipe with you. These are so moist and yummy. Best of all they are super simple with no raising or kneading. You can whip this batter up and throw them in the oven to have them for dinner. We had these for supper with pork chops and fried taters.
Easy Dinner Rolls
2 c. self rising flour
1 c. milk
2 T. sugar
4 heaping T. of mayo
Combine flour and milk. Add sugar and mayo and stir until just combined. Spoon into a buttered muffin tin. Bake 350 degrees for 12-15 min. Serve warm with butter; Enjoy.
Sunday, February 24, 2008
Waxed Egg Tutorial
Good Morning Everyone! Sunday services were cancelled here this morning due to the weather. When I stepped outside to go to church it was sleeting and then I got the call that church had been cancelled. So I got a early start on Sunday's tutorial. Me and the critters headed out to the workshop to get started as you can see one critter (the kitty) got harassed a little. But any way let's get down to business. Here is what you will need!
Supplies:
1 pound of wax (I used beeswax)
electric burner (purchased mine at BigLots for $6.00)
old metal pan
old cooker
Crayons and or candle dye
candle scent (optional)
spices (I used cloves and cinnamon)
paper mache eggs
To start off I recommend using and electric burner because this is super MESSY! You will destroy your stove top if you try to do this on your stove! If you do use your stove protect it using foil. OK let's begin; Cover the area you will be working in with foil. Essentially what we are doing is creating a double boiler. Fill your cooker with water and place the metal pan on top. Add your wax to the metal pan and turn on high to melt your wax. This will take awhile so in the meantime get your eggs ready by taking the stickers off them. Mix your spices in a plastic tub and sit the tub next to your double boiler. When your wax has completely melted add your scent. Now comes the creative part mix and match dyes and crayons to get the color you want. I used a tiny bit of brown candle dye and one blue crayon. This will give them a barely blue hue. THIS PART IS CRITICAL PLEASE READ CAREFULLY!!!! Turn your wax off and allow it to cool. When you see your wax beginning to set up around the edges you can begin. BE VERY CAREFUL the wax may still be hot; Working fast submerge your egg in wax and dunk immediately in spices and roll around. Dip in wax again and back in the spices. Repeat for all the eggs. You must work fast during this process and you can mold the egg with your hands while it is still warm, making sure it is smooth. Display on a bed of grass and Enjoy!
I so enjoy doing these tutorials the only thing I ask is please do not sell these directions. Give them to your friends and family freely as they were freely given to you. I sure hope you guys had a blessed Sunday; I have hummed the words all day to one of my favorite hymns; Hold to God's Unchanging Hand. And that is my prayer to you my friends that you will hold to God's unchanging hand. Blessings to you all.
Jill
Thursday, February 21, 2008
Spring Cleaning
Hello everyone! I am blogging in the midst of a downpour of freezing rain outside! I sure hope the power stays on for me to finish cleaning. Whew I have been on a two day cleaning/organizing spree. I have throw tons of stuff away as the hubs cringed and protested. I have set aside piles of items to give away and sell. I like to do this every year to get rid of things that have piled up over the winter. I going for a more minimal clean look in my decorating; I AM SO SICK OF DUSTING!!! I am keeping things that I really like and getting rid of the rest! Here are some decluttering tips!
1. Work on one room at a time and complete it before moving on to the rest.
2. Create three piles; Trash, GiveAway and Sell Pile
3. When you buy a piece of clothing or home accessory get rid of an item
4. Donate all clothes you have not wore in a year
Isn't it funny how we accumulate so much stuff? My next goal is to work on the "JUNK ROOM" that dreaded room in my home that catches everything from the vacuum sweeper to shoes to tax papers. It needs a major overhaul. I got the bathrooms in tip top shape today and organized everything. Wow I didn't know I had so many hair products! Hope you guys are staying warm!
Blessings,
Jill
Cleanliness is next to Godliness
Monday, February 18, 2008
Sunday, February 17, 2008
Grubby Pantry Jar Tutorial
Greetings everyone! Hope you are all having a blessed Sunday. The weather here in Ky is awesome. It's 68 degrees out now. Today I am going to be sharing with you how to make grubby pantry jars. Please feel free to leave me a message if you have any questions. I love talking with you guys and meeting everyone.
SUPPLIES NEEDED:
Clean spagettii jar or other glass jar; label removed
Spices
Large Deep Bowl
Mod Podge
Brushes
Homespun
Twine
Printed Label that has been stained
Ok folks once again if you have a nice manicure please wear gloves. Unless you are a country girl like me who keeps paint, spices and wax on hands and nails at all times! Let's begin by gluing are stained label onto the glass jar using the mod podge. Allow this to dry for a few minitues. While this is drying grab a large deep bowl and mix your spices in it. It's best to start with about 3 cups of spices, I used allspice and cloves. Use a container with a lid to save the spices that are left, or a zip bag is fine too. Now we can move on to brushing mod podge all over the jar with the exception of the rim. It's best to hold onto the jar by the rim and spin it around; doing the bottom last. DO NOT apply glue to your label only around the edge and slightly onto the label as much as you'd like. Take your jar and roll it around in the spices taking your hand and pressing and tamping the spices on gently. Once you have the jar covered set it upside down to dry. This may take awhile depending on the weather, room temp and so on. When you can touch it without removing alot of spices repeat the about process. Set it upside down and allow to dry for a couple of hours until its rock hard. After the jar has cured brush on one final coat of mod podge; this time go over the label too. DO NOT roll the jar in spices again. Allow to dry. To add the finishing touches rip a piece of stained muslin or homespun to fit the top of the jar and tie tightly with twine. You now have a wonderful early looking pantry jar!
God Bless,
Jill
Psalm 1:3And he shall be like a tree planted by the rivers of water, that bringeth forth his fruit in his season; his leaf also shall not wither; and whatsoever he doeth shall prosper.
Friday, February 15, 2008
Valentines Day
Did you guys have a lovely Valentine's Day? I sure hope you did! I recieved this super cute monkey that whistles and a card and candy. I also purchased for myself this wonderful remake of the Betty Crocker Cookbook from the 50's. It is awesome and has some fab recipes and tells how to do everything from measuring to broiling to steaming. There are some recipes I am dying to try when I find the time. This cookbook was a culinary bible to many housewives in the 50's and now I see why. What a great gift for a new bride!
Did any of you guys actually stick to your New Year's Resolutions? Lol, I didn't even start. Mine were to go on a diet (hasn't happened as of yet) and the other was to declutter our office slash junk room. I have made minimal progress; I went through the closet and put together bags of clothing to take to Goodwill. Problem is I haven't actually taken the bags yet. I also went through our papers and reciepts and threw a bunch of stuff away. Probably stuff I shouldn't have. I hate clutter and I so enjoy throwing things away. Lol, and the hubs go's balistic because he feels we should keep everything even if it doesn't work! Go figure.
I am so itching to redecorate and spring clean. I am actually excited about it this year because I have so many ideas. And I have committed a carnal decorating sin..............I have no curtains in our bedroom! I took my old ones down months ago and have never made more! Tisk Tisk I do have lots to do.
Tuesday, February 12, 2008
Honest Abe
Greetings Everyone! As they saw around here if you don't like the weather here in Kentucky wait a few days because it's bound to change. It reached the 60's today while northern Ky got pounded with a winter storm. I took advantage of this rainy warm day by working in the shop. I tidied up a bit and worked on some new designs. In honor of Honest Abe's birthday I made this framed picture of him. I used a copy of a very old photo and mounted it on repro brown fabric. The rain pounding on the tin roof in my workshop was music to my ears and the ideas were flowing. Thank goodness because I have been in a design funk; struggling to get inspiration. I also whipped up a batch of Nestle Toll House cookies while hubs and I watched one of my favorite shows American Idol! This will make the third season I have watched it relgiously; I TIVO it when I am not going to be home. Hope you all had a blessed day!
Sunday, February 10, 2008
Easter Box Tutorial
Paper Mache Boxes
Printed out Easter postcard images fit to size of your boxes
Mod Podge
Instant Age Varnish
Burnt Umber Paint
Sky Blue Paint
Cardboard to protect surface
Paper towels
Brushes
lol OJ to fight the FLU (just kidding)
Ok for starters these are so simple to make! You can use this techinque for any seasonal or non seasonal box. I do the same thing just using primitive colors and no images at all. I got my Easter graphics from a wondeful graphic cd called Holiday Gatherings. I purchased it from Hazel Ruthe. Ladies if you have nice lovely manicures please put on some gloves because this could get messy. I used a pop carton box opened up to protect my tabel. I began by painting all the insides of my boxes and lids with burnt umber paint. Next use the sky blue on the outside. Making sure you dry brush it on in a cross hatch motion. Leave lots of unpainted spaces; this looks nice after the antique process. Let these dry completely. Now moving on to the antique process. You will need two paper towels one damp and one dry. Working fast brush on your burnt umber paint over the sky blue; take your damp paper towel and rub it all in. Fisnish by using the dry paper towel. Repeat for all boxes and lids. Now you will need to cut out your images to size on your box. Brush the back with Mod Podge and center on your box front. Allow these to dry completely. The last and final step is to apply a instant age varnish to all the boxes including the glued on images. Whaaaalahhhhh you have a set of Easter Boxes! Now clean up your mess and wash out those brushes :) Have a blessed Sunday everyone!
Wednesday, February 6, 2008
Deadly Weather
For those of you that haven't heard a massive storm system left a trail of destruction through 5 southern states last night. At 2:00 am we left our home to go to my parent's storm shelter. They were nine of us squeezed in there together and we kept watch until about 5:00 am. Being in southeastern Ky we were spared for the most part as the storm had weakened when it reached us. It was by all means a very SCARY night and my prayers go out to all affected. I feel truly blessed to have not been touched by the storm.
Monday, February 4, 2008
Is it REALLY Winter???
I just came in from the workshop and I am blown away by the weather! it is warm outside; warm enough to have the door to the workshop open and no heat. We are suppossed to reach close to 70 tomorrow with some BAD storms. It is confusing as one day its bitterly cold and the next warm. I think this is contributed to the flu spreading. I am happy to say the hubs is almost recovered and I am symptom free..........lol at least for now.
The photo above is of my favorite bear made by Dru Ann at Cinnamon Creek Cabin. Don't you just love him??? My sister made the pillow beside him.
Another issue of Ranting Raven has released some come take a peek see when you get a chance! Blessings to you all!
http://www.rantingraven.com/Exhibit185.php
Subscribe to:
Posts (Atom)