
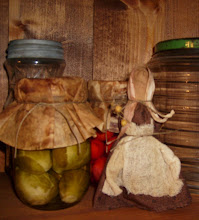


I finally finished my apple head doll. I had so much fun making this doll, I sure hope you try this project. I did her a little differently than the early ones that were made. Mine has a cloth body instead of a wire one. It just gives her a more substantial feel. Also I did not include detailed instructions on sewing the dress since I know most of my readers are experienced artists but if you need additional help just email me and I will try to help :) gigi252000@aol.com
 Place a large bead of hot glue on one end of the toothpick and insert it in the apple in the bottom.
 Cut two very small slits in your body, cut one on each side close to the side seams where the shoulder area is. Place your 12 inch long piece of wire through one hole and the body and then out the other hole. Run a long bead of hot glue around your neck opening, insert toothpick and head and hold until it dries.

Here are the dress measurements: Dress bodice cut 2 pieces 4 3/4" wide by 2 1/2" long

After sewing your dress together and turning right side out place on your doll. Glue dress around the dolls neck. Bend over both ends of your wire arms. Paint both wood beads with nutmeg brown paint and let dry. When dry put a dollop of hot glue inside each wood bead and insert the wire. You will be gluing a bead to each end of the wire. Hand gather sleeves around wooden hands and tie off. Place a drop of glue so sleeves don't slid up and down the wire. Now comes the fun part! Embellish your doll however you want. I made mine into a spooky witch for Halloween. I glued on some flax for hair and then a little witch hat. If you want to make yours a old woman instead of a witch just add a homespun scarf around her head. You can also use yarn or wool for the hair. I added some vintage lace around her neck and tied a cheesecloth apron around her. To finish her off lightly sand her dress and dust her with cinnamon.

ENJOY!
Goodes Needed
1 dried sealed apple head
1 toothpick
2 wood beads
12 inch long piece heavy gauge wire
muslin
gray or black fabric
Nutmeg brown paint
flax, wool or yarn for hair
Embellishments such as lace, a witch hat, head scarf and cheesecloth
First you will need to sew together your body. Cut 2 pieces of muslin 3 1/2" wide by 6" long. Sew them together leaving an opening at the top in the center for turning. Turn right side out and stuff firmly.
 Place a large bead of hot glue on one end of the toothpick and insert it in the apple in the bottom.
 Cut two very small slits in your body, cut one on each side close to the side seams where the shoulder area is. Place your 12 inch long piece of wire through one hole and the body and then out the other hole. Run a long bead of hot glue around your neck opening, insert toothpick and head and hold until it dries.
Here are the dress measurements: Dress bodice cut 2 pieces 4 3/4" wide by 2 1/2" long
For sleeves cut 2 pieces 3 1/2" wide by 7" long
For skirt cut 2 pieces 10" wide by 8" long

After sewing your dress together and turning right side out place on your doll. Glue dress around the dolls neck. Bend over both ends of your wire arms. Paint both wood beads with nutmeg brown paint and let dry. When dry put a dollop of hot glue inside each wood bead and insert the wire. You will be gluing a bead to each end of the wire. Hand gather sleeves around wooden hands and tie off. Place a drop of glue so sleeves don't slid up and down the wire. Now comes the fun part! Embellish your doll however you want. I made mine into a spooky witch for Halloween. I glued on some flax for hair and then a little witch hat. If you want to make yours a old woman instead of a witch just add a homespun scarf around her head. You can also use yarn or wool for the hair. I added some vintage lace around her neck and tied a cheesecloth apron around her. To finish her off lightly sand her dress and dust her with cinnamon.

ENJOY!
As with all my tutorials please do not sell these directions; share them freely with your friends as they were freely given to you. Feel free to make these to sell for profit, if selling them online please mention my name.
God Bless,
Jill
4 comments:
Hi Jill; we left Mr Odee something on our blog; we hope you approve!!! We love those Boston Terriers! Merrie
Thanks so much for this tutorial...I have always wanted to do one of these, the corn cob dolls and the black sock dolls...Now you have shown me how to do one of them...I appreciate it very much..
Hugs
Sue
Oh Jill, that looks sooo good. Thank you for the tutorial. I will have to give it a try. I need to try the corncob babies too.
Disturbing.
Post a Comment