


Monday, March 31, 2008
Sunday, March 30, 2008
Rusty Can Tutorial


Greetings everyone! I hope you all had a lovely Sunday. The weather was a little cool here but still lovely. I am so excited to share this with you guys! I have became a recycling nut. I have been finding many uses for everyday items. Hope you enjoy this project.
Supplies Needed:
Tin Can (I used a spaghetti can)
Mod Podge
Spices
Let's begin. I began by washing out my can well and removing the label. After the label is removed refer back to these steps in my previous tutorial on grubbing jars http://thefruitofherhandstudio.blogspot.com/2008_02_01_archive.html
After you have your can grubbied it looks rusty. This step is optional; I printed out my label and stained it with walnut crystals. Using your mod podge glue it on and fill your can with sweet annie! What a lovely display.
As always please do not sell the directions to this tutorial; give them freely to your friends as they were freely given to you.

Saturday, March 29, 2008
Daddy's 60th Birthday


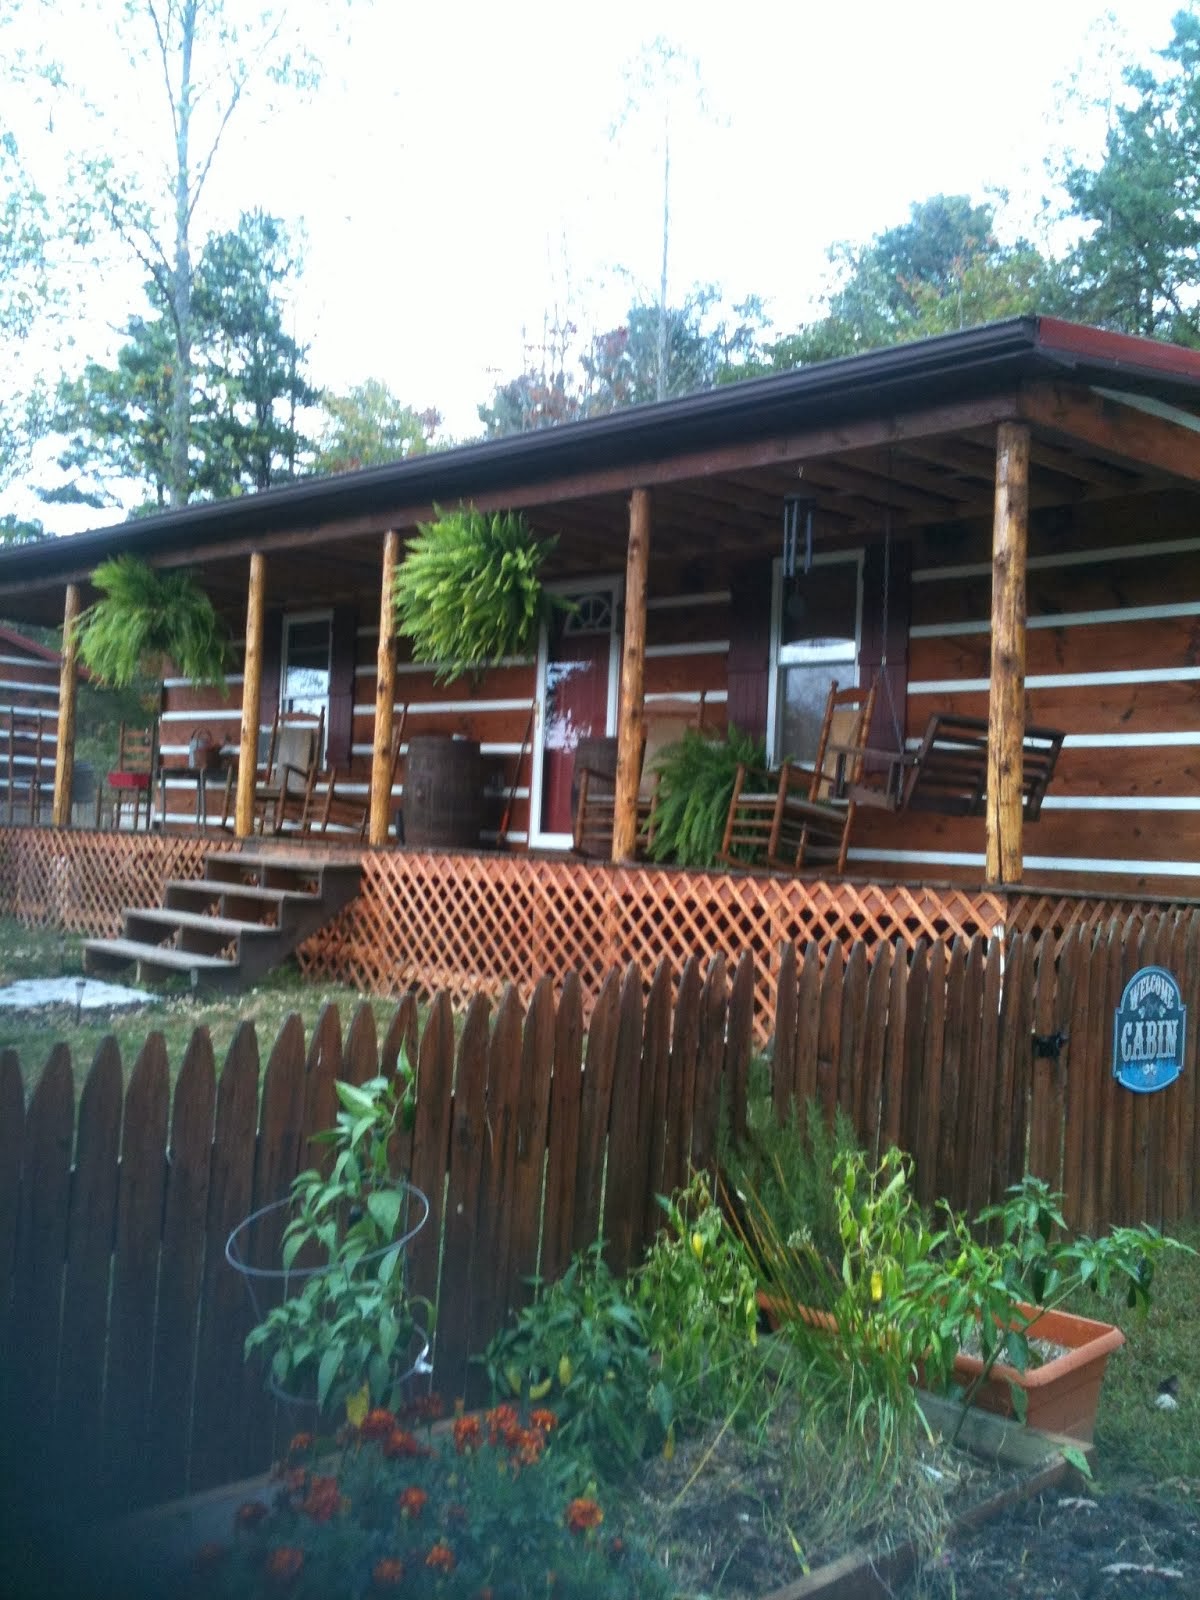
We had the joy of celebrating daddy's 60th birthday today! We had so much fun; we grilled out at mom and dad's and had lots of yummy food. Pork chops, bacon, polish sausage, fried corn, fried taters, shuck beans and cornbread. As well as a cheesecake and the chocolate cake I fixed yesterday. We sure ate good :) It's hard to believe my daddy is 60; seems like just yesterday he was only 50. Time sure flys by! My daddy is and will always be my hero. In my eyes there is nothing he can't do or doesn't know. He is a mechanic, carpenter and does concrete work and in past years did logging and ran a sawmill. He has been self employed and worked hard all his life supporting us four girls and mom. Dad is always working on something; lots of days he comes home from working to garden or can food for the winter. He is rarely ever idle and strives for perfection in everything. We often disagree when he is making furniture for me, he wants it to look new and I want it to look old! I tell him "Daddy it's supposed to be primitive!" and he just rolls his eyes! Lol that's Dad for you! Hope you guys enjoyed the pics of the view from mom and dad's. In one photo you can see the old house daddy grew up in which has fallen down.
Thursday, March 27, 2008
HERSHEY'S Chocolate Sour Cream Cake & Baked Ziti


Chocolate Sour Cream Cake Ingredients:
1-3/4 cups all-purpose flour
1-3/4 cups sugar
3/4 cup HERSHEY'S Cocoa
1-1/2 teaspoons baking soda
1 teaspoon salt
2/3 cup butter or margarine, softened
1 container (16 oz.) dairy sour cream
2 eggs
1 teaspoon vanilla extract
FUDGE FROSTING(recipe follows)
Directions:1. Heat oven to 350°F. Grease and flour 13x9x2-inch baking pan.2. Stir together flour, sugar, cocoa, baking soda and salt in large bowl. Add butter, sour cream, eggs and vanilla; beat on medium speed of mixer 3 minutes. Pour batter into prepared pan. 3. Bake 40 to 45 minutes or until wooden pick inserted in center comes out clean. Cool in pan on wire rack. Frost with FUDGE FROSTING. 12 to 15 servings. FUDGE FROSTING 3 tablespoons butter or margarine 1/3 cup HERSHEY'S Cocoa 1-1/3 cups powdered sugar 2 to 3 tablespoons milk 1/2 teaspoon vanilla extract. Melt butter in small saucepan over low heat. Add cocoa; cook, stirring constantly, just until mixture begins to boil. Pour mixture into medium bowl; cool completely. Add powdered sugar alternately with milk to cocoa mixture, beating to spreading consistency. Stir in vanilla. About 1 cup frosting.
Baked Ziti
1 large can Hunts Meat Spaghetti Sauce
1/2 c. fettuccine Alfredo sauce (I used Bertolili's)
1 pound mild sausage
1 half of a 16 0z box of Rigatoni Noodles
1 bag mozzarella cheese
Parmesan cheese
Begin by bringing your pasta water to a boil; when it reaches a boil add some salt and oil to the water. Put in your pasta. While pasta is cooking fry your sausage until brown and no longer pink. Add your sauce and I add some sugar to taste. Set aside. Cook your pasta till almost done. Pour pasta in a 13 x 9 pan add sauce and stir together. Pour Alfredo sauce over the top. Sprinkle the whole bag of cheese over that. Add a dusting of Parmesan cheese. Bake at 350 for 30 min.
I hope you guys enjoy these recipes! They were both so yummy! It was cold and rainy here today and perfect weather for some comfort food! I have been working ALL night on taxes. Oh lordy I hate doing taxes because I have to gather all my info for two businesses (we also have a convenience store). And let me tell you it's takes awhile and we are cutting it close this year. Hope you are all having a blessed Friday!
Monday, March 24, 2008
I have been Tagged

Thanks Angie! Angie from Love the Prim Look has tagged me! I am tagging; Sharon of Homespun Heart Primitives, Andi of Andi's Everyday Adventures and Simple Folk.
Seed Bag Tutorial


 Supplies Needed:
Piece of calico or feed sack
Twine
Latch Pin
Coffee Stain or Walnut Crystals for Staining
Let's Begin! I am sure many of you already know how to make these but in case you don't here's how. Start by ripping the fabric to measure 12 1/2" wide by 7 1/2" tall. Fold the top down on the wrong side about 3/4". You will now need to sew along the bottom where you folded it down; you are making a casing for your twine string. Now cut a length of twine 19" long and tie a knot in both ends. Attach a latch pin to the end and feed through the casing. Put the fabric right sides facing and sew along one side and along the bottom. Make sure not to sew through the casing; just sew right up to the casing. Turn right side out and stain. Allow to dry and draw your string up. Perfect to hang on your pegs! To make them look even older sand them or make them from old fabrics.
Blessings,
Jill
Saturday, March 22, 2008
Easter Blessings
 Greetings Everyone! Just a quick note to let you guys know there will be no Sunday Tutorial. I will instead post a Monday Tutorial. I have so much going on tomorrow I won't have time to do the tutorial. I know you guys will have lots of plans too. I have been busy all day...........cooking, cleaning and doing laundry. As well as doing outside chores! We will be having Easter service at church tomorrow and then it is the MIL's birthday. After church I will be taking her cheesecake (the cake she requested) and her gifts. Luckily she loves primitives so I made her two cupboard mice and purchased a Herbs sign made from an old fence post for her. Along with some waxy bulbs for her window lights. My contribution to the church meal was a turkey breast, blueberry blunder cake and a hash brown casserole. If I have time in the morning I will be making yeast rolls. Lol, but it isn't looking good I still have laundry in the dryer at 12:35 am. I hope that you all have a wonderful blessed Easter! Here is the recipe to my Blueberry Blunder (lol which I invented........it was a bit of a blunder)
Blueberry Blunder Cake
1 box white cake mix
2 8oz Cool whip Tubs
1 8oz cream cheese softened
1 c. powdered sugar
2 cans blueberry pie filling
1 T. of milk
Bake cake as directed on package; Cool completely. While cooling prepare filling. Mix cream cheese, powdered sugar,1 tub of cool whip and milk. Mix with a mixer until smooth, if the mixture is too thick and unspreadable add a little more milk. Crumble cooled cake into pieces; Put half of the cake in the bottom of a 13 x 9 pan or trifle dish. Layer next one can of pie filling and half the cream cheese filling. Top with the rest of the cake, another can of pie filling and the rest of the cream cheese filling. Last put the other tub of Cool Whip. Chill before serving. This is sooooooo Yummy!
Friday, March 21, 2008
Good Friday

I did a little research on the Internet to learn that this day was originally called "God's Friday" and was later changed to "Good Friday". I also read people mistakenly think this is a day for joy and celebration because of the word "good" when actually it's a day for mourning and contemplation of things that have passed. It is a day to remember how our Lord and Saviour suffered for our soul's sake. On Easter we can all rejoice that indeed he was resurrected from the grave. Just some food for thought today.
Blessings,
Jill
And when they were come to the place, which is called Calvary, there they crucified him, and the malefactors, one on the right hand, and the other on the left.Luke 23:32-34
Wednesday, March 19, 2008
Old Linens on Ebay

I have listed LOTS of old linens on Ebay! It's a perfect day for it too; it's raining cats and dogs. I have been going through some of my goodies. I have more than I could ever use in a lifetime, so I need to part with some. Hope you are all having a wonderful day.
Sunday, March 16, 2008


Greetings Everyone! Thank you for joining me for this Sunday's tutorial. I will be sharing with you how to make a doily Easter basket. I have lots of chores to do today so I will be doing something quick and simple. I originally saw this on Martha Stewart and had to make one and prim it up. Hope you enjoy!
Supplies:
Fabric Stiffener
Rusty Wire
Stained Doily
Non Stick Spray
Spices (optional)
Tools Needed:
Wire Cutters
muffin tin or bowl for mold
Let's begin; For starters there are many ways you can shape these baskets. You can use any size doily you like. If you are using a smaller doily you can use a muffin tin and it will come out with a fluted edge like the one I made. If you are using a larger doily use a bowl.
To begin make sure your surface is protected and completely saturate your doily with fabric stiffener. Spray your mold/bowl with non stick spray and lay your doily over it. Make sure it's smooth . Let the doily dry overnight. Remove the doily gently from the mold/bowl and sprinkle it liberally with spices; shake off excess. Cut a piece of rusty wire for the handle and embellish the basket as you please.
Friday, March 14, 2008
Tutorial Questions

Hello everyone! I hope you are all having a blessed day. I have received lots of questions from my tutorials. One of the questions asked is "Do you delete old tutorial post?" The answer is no I do not delete them. You can view any of my old tutorials by going to the sidebar menu and looking under BLOG ARCHIVE. I have also been asked "How do you keep fingerprints from showing on your waxed eggs?" The answer is it doesn't matter.............lol the spices cover a multitude of sins. When they are rolled in the spices if done quick enough it hides everything. And thanks to you all who have emailed and commented on my tutorials! Please feel free to email me if you have any questions gigi252000@aol.com
Thursday, March 13, 2008
Hippity Hop Easter's on It's Way
 Wow Can you believe it's almost Easter? This year is flying by in a hurry! We were blessed with another warm sunny day. The above waxed basket is my very fist ETSY item! I was busy today making new items for Simply Primitives. Here is the Etsy link http://www.etsy.com/view_listing.php?listing_id=10129401 There sure are some wonderful artist on here. Hope you will come and check them all out. Bless You All.
Bless you all!
Wednesday, March 12, 2008
Yummy Casserole

What a glorious day here in Kentucky! It was in the 60's and we enjoyed every minute of it. I opened the windows in the workshop and let the clean crisp spring air in. I do love spring! I also whipped up this yummy casserole for supper. It is a Pioneer Woman Cooks recipe and I was very impressed with it. This recipe is a keeper! Here is the link to the recipe. I omitted all the veggies because we don't like them...........but I kept everything else the same. Have a blessed day!
Jill
Sunday, March 9, 2008
Civil War HardTack Tutorial


Hi everyone! I hope you are all on track and have sprung ahead! Here at our house church service was cancelled because of the snow and we slept in till 12. For some reason for a day or two after the spring forward time I can't get to sleep at night and then sleep half the following day. But I am so excited to share this recipe with you guys. I saw these on Ebay and were impressed with them. After trying many recipes I have found the perfect method. I have always been interested in the Civil War era and continue to be. What another perfect project to do with your children or grandchildren. You could even work in a history lesson about how the Civil War soldiers carried these around in their "haversacks" and were only rationed 6 to 8 of these for three days. And these are perfectly fine to eat and resemble the modern saltine cracker. But before we get started here is a little history on these.
The soldier's diet was very simple- meat, coffee, sugar, and a dried biscuit called hardtack. Of all the items soldiers received, it was this hard bread that they remembered and joked about the most.
"'Tis the song that is uttered in camp by night and day,'Tis the wail that is mingled with each snore;'Tis the sighing of the soul for spring chickens far away,'Oh hard crackers, come again no more!''Tis the song of the soldier, weary, hungry and faint,Hard crackers, hard crackers, come again no more;Many days have I chewed you and uttered no complaint,Hard crackers, hard crackers, come again no more!"-from a soldiers' parable called "Hard Times"
"'Tis the song that is uttered in camp by night and day,'Tis the wail that is mingled with each snore;'Tis the sighing of the soul for spring chickens far away,'Oh hard crackers, come again no more!''Tis the song of the soldier, weary, hungry and faint,Hard crackers, hard crackers, come again no more;Many days have I chewed you and uttered no complaint,Hard crackers, hard crackers, come again no more!"-from a soldiers' parable called "Hard Times"
Hardtack was a biscuit made of flour with other simple ingredients, and issued to Union soldiers throughout the war. Hardtack crackers made up a large portion of a soldier's daily ration. It was square or sometimes rectangular in shape with small holes baked into it, similar to a large soda cracker. Large factories in the north baked hundreds of hardtack crackers every day, packed them in wooden crates and shipped them out by wagon or rail. If the hardtack was received soon after leaving the factory, they were quite tasty and satisfying. Usually, the hardtack did not get to the soldiers until months after it had been made. By that time, they were very hard, so hard that soldiers called them "tooth dullers" and "sheet iron crackers". Sometimes they were infested with small bugs the soldiers called weevils, so they referred to the hardtack as "worm castles" because of the many holes bored through the crackers by these pests. The wooden crates were stacked outside of tents and warehouses until it was time to issue them. Soldiers were usually allowed six to eight crackers for a three-day ration. There were a number of ways to eat them- plain or prepared with other ration items. Soldiers would crumble them into coffee or soften them in water and fry the hardtack with some bacon grease. One favorite soldier dish was salted pork fried with hardtack crumbled into the mixture. Soldiers called this "skillygallee", and it was a common and easily prepared meal.
From
Let's Begin!
Supplies:
All Purpose Flour
Salt
Water
Vegetable Shortening
Preheat oven to 400 degrees; Combine 2 c. of ap flour and 6 pinches of salt. With hands stir in 1/2 c. of water and 1 T. of veg shortening. If dough is still dry add a little more water. Making sure dough is not sticky. Place dough onto a floured surface and knead for a few minutes. Roll dough out into a rectangle shape about a half inch thick. Cut into three by three inch squares (a pizza cutter works perfect for this)and place on a non greased cookie sheet. Dip the tines of a fork into flour and make 16 holes in each cracker. You will have four rows with four holes; do not pierce all the way through. Turn cracker over and repeat. Bake in the oven for 20 to 30 min until edges are brown and cracker is completely hard. When they are hard and dried out turn your oven off and let them cool in the oven with the door shut. The bake time will vary greatly depending on your oven and the thickness of your dough. So watch these carefully! As for storing these crackers for display I am going to try putting them in a screw top jar. Hopefully pest will not be able to get in them that way. Hope you guys enjoy making these and as always please do not sell these directions; share them with your friends freely as they were freely given to you.
Blessings,
Jill
Saturday, March 8, 2008
Snowed In


 We got pounded last night with a winter storm and got about 5 inches of snow! The most we have had this season. But the most bizarre thing happened last night, it was sleeting ice and thundering at the same time. What weird weather we are having! My little snow bunny Roxy blends in with the snow. Daisy and Odee also had their play time out in the snow and Odee had snow all over his whiskers. The robins and cardinals were out bouncing from tree to tree and singing a lovely tune. It was a beautiful cold March day. Stay tuned tomorrow for Sunday's tutorial! Blessings,
Jill
Friday, March 7, 2008
New Shelf

Look at my new shelf my dad made! I snapped this photo after I painted and stained it. I just love the way it turned out with the plank back. I am blessed to have a daddy who can make anything. I gave him a photo of one I saw and he made it.
We are expecting a huge winter storm here in Kentucky today. They are forecasting six inches or more! I made a quick dash to the store to stock up on some things. I don't mind at all being snowed in as long as I have my necessities such as pop........lol. Hope you are all safe and warm!
Jill
Sunday, March 2, 2008
Early American CornCob Doll Tutorial


Hello everyone! Hope you are all having a blessed Sunday! I had intended on today's tutorial to be on how to make hard tack. However last night I realized I was out of one of the ingredients so I came up with a whole new tutorial. This was the first time I have ever made one of these dolls and it was so fun and easy. This is a perfect safe project to do with your children as you explain to them that earlier pioneer children used to play with these. Here is a bit of history on these wonderful little dolls;
In the earlier days of our country, corn was used for a variety of things. Corn was eaten by the pioneers and also fed to the livestock. All parts of the corn plant were used. The cornstalk was used to fashion corns stalk fiddles; the corn husks were braided into primitive chair seats, baskets and rugs; the corncobs were ground into feed or fertilizer OR were used to make dolls.
One of the most popular uses of the corn husks was the making of traditional corn husk dolls, a craft the settlers acquired from the Native American Indian. The corncobs were made into 'play-pretty' dolls. Very few early American families could afford store-bought dolls,but almost anyone could make a primitive corn husk or corncob doll.
One of the most popular uses of the corn husks was the making of traditional corn husk dolls, a craft the settlers acquired from the Native American Indian. The corncobs were made into 'play-pretty' dolls. Very few early American families could afford store-bought dolls,but almost anyone could make a primitive corn husk or corncob doll.
Supplies:
1 dried out corncob; corn removed
scrap piece of homespun or calico
scrap piece of stained muslin
cheesecloth
corn husk for bonnet (cheesecloth or fabric also works)
twine
sewing thread
spices (optional)
Lets begin!
Begin by tearing your muslin into an inch wide strip. Wrap the strip around the cob from top to bottom. I used two strips tacking it off with thread where the strip ends. At the top only,hand sew a gathering stitch and pull tight. Tack thread down. Cut out two rectangles of your dress fabric. Sew up the two sides by hand or machine. Turn the edge under on the top edge of the dress and sew a gathering stitch. Pull tight and tack to the doll. Now is where you can get creative. Stitch a face or leave it plain; I grubbied my face with spices. I cut a small piece of cheesecloth and tied it to the doll loosely; making sure you don't cinch the waist in too much. If you are using dried shuck for the bonnet cut a small 1 inch wide piece and tie it on with twine. I added a little sprig of dried flax in her apron. Enjoy your Early American CornCob Doll :) As with all my tutorials all I ask is that you do not sell these directions. Please share with others freely as it was freely given to you. May God Bless You All.
Jill
Saturday, March 1, 2008
Ranting Raven
A new issue of Ranting Raven has just released! Come check it out when you get a chance. http://www.rantingraven.com There are some wonderful artist on there. Tune in tomorrow for Sunday's tutorial.
Blessings,
Jill
Blessings,
Jill
Subscribe to:
Posts (Atom)